A more advanced wxErlang Hello World
In the previous post, we saw how to fire a simple message box from iex. In this blog post, we’ll go deeper (not too much!) and present the elements wxFrame, wxButton, and wxTextCtrl.
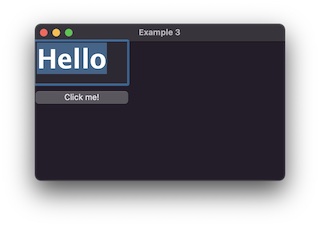
The app we’ll build looks like this:
Creating a new mix application
Let’s create a new mix application by doing
mix new advance_hello_world
cd advance_hello_world
Exporting Erlang macros as functions
wxErlang is an Erlang binding. Even though we can use it from Elixir, there are a few gotchas that we need to know. One of the issues is that wxErlang defines several (a ton) of constants as Erlang macros that we can’t use directly from Elixir. But there is a trick that we can use, and that mix makes it very simple to do.
Create a src folder in the root of the project and a file named wx_const.erl
mkdir src
touch src/wx_const.erl
In the file add the following Erlang code
-module(wx_const).
-compile(export_all).

-include_lib("wx/include/wx.hrl").

wx_id_any() ->
  ?wxID_ANY.

wx_fontfamily_default() ->
  ?wxFONTFAMILY_DEFAULT.

wx_fontstyle_normal() ->
  ?wxFONTSTYLE_NORMAL.

wx_fontweight_bold() ->
  ?wxFONTWEIGHT_BOLD.
Here, we’re creating a new module in Erlang that exposes functions that return the value of the Erlang macro. Although we can’t call Erlang macros directly from Elixir, we can call functions. So, we can call :wx_const.wx_id_any() which returns whatever value is stored in ?wxID_ANY macro.
wxFrame
With the macros thing out of the way, let’s talk about the object wxFrame. Through the documentation we can know that
A frame is a window whose size and position can (usually) be changed by the user.
It usually has thick borders and a title bar, and can optionally contain a menu bar, toolbar, and status bar.
A frame can contain any window that is not a frame or dialog.
Creating a frame is as simple as calling.
frame = :wxFrame.new(:wx.null(), wx_id_any(), 'Advance Hello World!')
Where wx.null() is used as the parent window because in this case we have none. wx_id_any() is the id of the frame. In this case, we let wxWidgets assign any id. The last parameter is the frame title as a charlist.
wxButton
As you might expect, wxButton allows us to create buttons. Through the documentation we can know that
A button is a control that contains a text string, and is one of the most common elements of a GUI.
As explained in the docs, to create button, we can write the following:
button = :wxButton.new(frame, wx_id_any(), opts)
We tell the button that its parent window is frame.
wxTextCtrl
We’ll add text to our frame using a wxTextCtrl. As per the docs:
A text control allows text to be displayed and edited.
text_label = :wxTextCtrl.new(frame, wx_id_any(), opts)
An example is worth a thousand words
The app we’ll build looks like this:
Before clicking the button
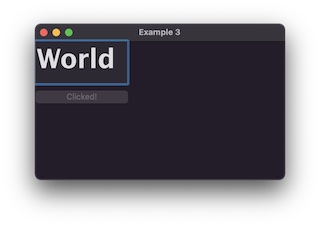
After clicking the button
In the folder lib, open the file named advance_hello_world.ex and replace the content with the following
defmodule AdvanceHelloWorld do
  import :wx_const

  def run() do
    :wx.new()

    frame = :wxFrame.new(:wx.null(), wx_id_any(), 'Advance Hello World')

    label = :wxTextCtrl.new(frame, wx_id_any(), [{:value, 'Hello'}, {:size, {150, 70}}])

    font = :wxFont.new(42, wx_fontfamily_default(), wx_fontstyle_normal(), wx_fontweight_bold())

    :wxTextCtrl.setFont(label, font)

    button =
      :wxButton.new(frame, wx_id_any(), [
        {:label, 'Click me!'},
        {:pos, {0, 64}},
        {:size, {150, 50}}
      ])

    :wxButton.connect(button, :command_button_clicked, [
      {:callback, &handle_click/2},
      {:userData, %{label: label}}
    ])

    :wxFrame.show(frame)
  end

  def handle_click({:wx, _, button, %{label: label}, _command}, _event) do
    :wxTextCtrl.setValue(label, 'World')
    :wxButton.setLabel(button, 'Clicked!')
    :wxButton.disable(button)
  end
end
and in mix.exs add :wx as an extra_application
def application do
  [
    extra_applications: [:logger, :wx]
  ]
end
Now start an iex session with the mix project loaded
iex -S mix
And we can run the “advance hello world” app by doing
iex> AdvanceHelloWorld.run()
Amazing!
Understanding the app
Let’s check the code in more detail
def run() do
  :wx.new()
  ...
In the previous blog post, we saw that first we need to create a context by calling :wx.new(). This will store a reference to wxWidgets in the current process dictionary.
frame = :wxFrame.new(:wx.null(), wx_id_any(), 'Advance Hello World')
This creates a new frame, which is a top level element, so we pass :wx.null(). We let wxWidgets assign an id automatically. “Advance Hello World” will be the title of the frame. Remember that strings in Erlang are charlist, not binaries.
Here we can see that the wx_id_any() function is one of the functions we defined in Erlang at the beginning of this post. We are getting the value of the ?wxID_ANY Erlang constant. We are importing all Erlang functions with import :wx_const at the top of the file.
label = :wxTextCtrl.new(frame, wx_id_any(), [{:value, 'Hello'}, {:size, {150, 70}}])

font = :wxFont.new(42, wx_fontfamily_default(), wx_fontstyle_normal(), wx_fontweight_bold())

:wxTextCtrl.setFont(label, font)
This code creates a label with the text “Hello” (as a charlist again) with a font-size of 42, the default font-family, normal font-style and bold font-weight. Notice that we tell the control to use frame as its parent window.
Now the fun part: the button.
def run() do
  ...

  button =
    :wxButton.new(frame, wx_id_any(), [
      {:label, 'Click me!'},
      {:pos, {0, 64}},
      {:size, {150, 50}}
    ])

  :wxButton.connect(button, :command_button_clicked, [
    {:callback, &handle_click/2},
    {:userData, %{label: label}}
  ])

  ...
end

def handle_click({:wx, _, button, %{label: label}, _command}, _event) do
  :wxTextCtrl.setValue(label, 'World')
  :wxButton.setLabel(button, 'Clicked!')
  :wxButton.disable(button)
end
To create the button, we set frame as the parent window, and we set a few properties: the label text, position, and size.
With :wxButton.connect we attach our button to an event. Every time the button is clicked, it’s going to call the callback handle_click/2. We also store a reference to the label we created earlier, so we can access it later.
handle_click/2 handles the click message, and it has two parameters. The first is the message that contains the element that triggered the callback. In our case, it is the button. And the second one is information related to the event. Notice that in the first parameter, we get the user data we passed when connecting the button to the event.
The first parameter of handle_click has the following structure
{:wx, _id, component that fired the event, user data, wxCommand}
while the second one has this structure
{:wx_ref, _id, :wxCommandEvent, []}
In the example, we change the label content from “Hello” to “World”. We change the button label to “Clicked!” and disable it.
Conclusion
We’ve created a more complex “Hello World” example this time. Now, we know how to create a frame with a label and a button. We attach an event handler to the button, and we update the label and the button text on the click event. Then we disable it.
We exported some constants from Erlang to Elixir by defining a module in the src folder and exporting each constant as a function.
In a follow-up post, we’ll explore the wx_object behavior to capture key events.